Image Resize for Windows is a handy utility for batch resizing images. I use that for batch resizing pictures, but the only thing about the resized pictures is that it puts “ (Custom)” or whatever size you specify in the filename. To rename the resized files you can use sed (if you have cygwin on Windows) to easily rename these files to what pattern you need. To do this a command like the following will do. This specific version will replace
find . -iname \*Custom\* | sed -e 's/\(.*\)\( (Custom)\)\(.*\)/mv "\0" "\1_small\3"/' | sh
Disclaimer: There are a gazillion ways to achieve this goal; this is just one of them.
Microsoft recently released the Service Pack 1 for Windows 7. When installing this through Windows Update it would keep failing and give me “code 80200053.” After looking around for a bit I found a solution that fixed this.
- Go to the Start menu and type “services.msc” and press enter.
- Find “Windows Update” service, right click on it and click “Restart.”
- Go to the Start menu and type “Windows Update” and try installing the service pack.
I am very picky about my development environment and I need it to be just right, otherwise the fun part of programming disappears. I have a dedicated Linux server in my office that is sharing and serving the development files. This is a solid server, fast enough that django’s development server refreshes as soon as I save the files, even before I have switched to my browser; and that’s how I like it! 🙂 Lately I have been on the road quite a bit so I have had to run the development environment on my tablet (when in Windows 7; runs excellent in Linux). The tablet has OK specs: 1.4GHz Core Duo with 2GB RAM and a 7200 RPM drive (generally the bottleneck). But for some reason django’s development server seems especially slow at serving the files. The refreshes after changes are OK, not fast, but OK. It is the media that it is very slow at serving (understandably so).
I did a lot of research on my options to speed this up. I am using the standard CPython distribution on Windows. I saw a lot of references to unladden-swallow, but there weren’t a lot of benchmarks to prove the speed gain yet. I realize that this is still under very heavy development, but the one benchmark that I found really excited me so I decided to give it a try. Unfortunately, after hunting for a number of source code packages necessary for compilation and still not succeeding I concluded that it wasn’t worth the time yet 😐 I decided to rule out pypy because of the possibility of compatibility issues, I wanted something that I could plug into the existing system. For some of my projects I am using external libraries, which might not work with pypy.
Anyways, my solution ended up involving Apache. Based on the console output of django’s dev server I had an idea that it was slow at serving multiple files. So I decided to serve the media, which generally is the majority of the files in a given view, using Apache and let django’s server deal only with the views. Microsoft’s IIS is also an option, but I had Apache setup for another project so I decided to use that. Below is a part of my dev_settings.py that makes this change.
1
2
3
4
5
6
7
8
9
|
import socket
# ...

# System specific dev settings.
if socket.gethostname() == "mystic":
	MEDIA_URL = 'https://thebitguru.com/projectname_media/'
	SERVE_STATIC_FILES = False
else:
	SERVE_STATIC_FILES = True
|
With this new combination and using 127.0.0.1 instead of localhost now my dev environment on Windows is fast enough to keep things interesting.
If you are a student then you should definitely check this out. Microsoft has a special for students where you can get Windows 7 upgrade for $30. The normal upgrade price for Windows 7 is about $129 right now. Windows 7 is definitely a worth upgrade for laptops. So, get it if you are student! 🙂
By the way, you might also have access to the MSDNAA program, which has Windows 7 Professional available for free. You can check if your school and program is participating by searching on the MSDN school search page.
I recently upgraded my main Windows Vista desktop to Windows 7 RTM. I chose to upgrade instead of doing a clean install because I had a lot of programs installed that I did not want to reinstall (too time consuming). The whole upgrade process wasn’t too bad, I had to uninstall a few programs and reinstall them after the upgrade. In addition to the uninstall/install, I encountered a few odd problems after the upgrade.
One of these problems was that my DVD drive disappeared. It wasn’t just the DVD drive, Daemon Tools’ virtual drive also wasn’t showing up. Looking at the devices in device manager I saw the following error.
Windows cannot verify the digital signature for the drivers required for this device. A recent hardware or software change might have installed a file that is signed incorrectly or damaged, or that might be malicious software from an unknown source. (Code 52)
After searching online I found out that this had to do with some drivers that iTunes, Zune (!) and a few other programs had installed. Most of these programs are compatible with Windows 7, but the upgrade process didn’t deal with this case very well.
Anyways, if you search online you will find several solutions that require you to play around with the registry or have you install some random driver. Some even suggest disabling driver signing check. I didn’t prefer doing any of these.
After a little more search I ended up on this Microsoft Help and Support article. It described the exact problem that I was having and it had an automated fix. When I downloaded and ran the fix, it complained that it doesn’t work with my version of Windows. Knowing that the fix was compatible with Windows Vista, the workaround was simple:
- Right click on the MSI that you downloaded.
- Go to the Compatibility tab.
- Check “Run this program in compatibility mode for:”
- Verify that the drop down says “Previous version of Windows”
- Click OK to complete.
Now you should be able run the fix. Restart after the fix has installed and your drives should be back. Have fun!
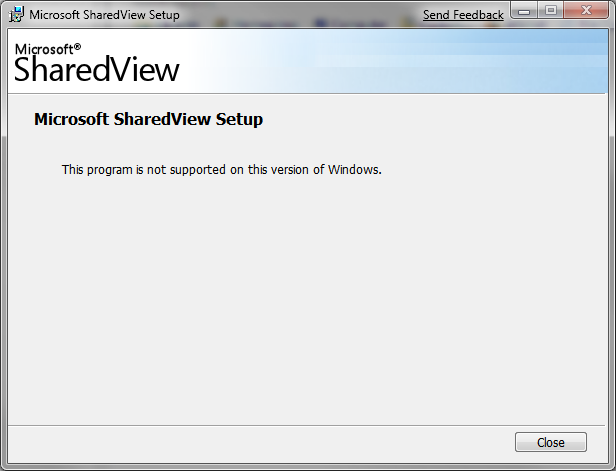
I am loving Windows 7 so far, but, unfortunately, SharedView refuses to install. I even tried it under “Windows Vista” compatibility, but no luck.
“This program is not support on this version of Windows.”
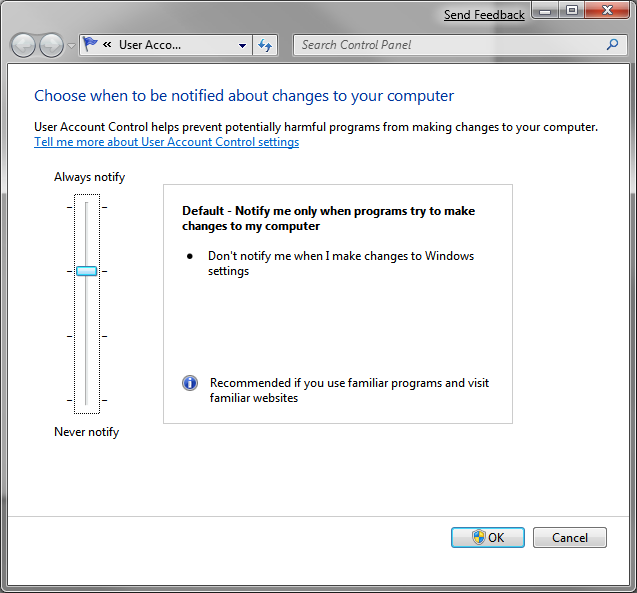
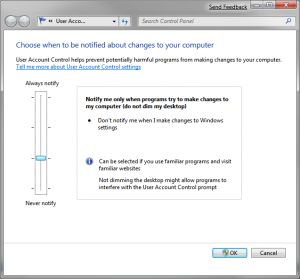
To disable the Secure Desktop in UAC elevation prompts in Windows Vista you had to go through group policy editor and dig into several nodes to find it, Windows 7 changes this by making it part of the UAC settings. In Windows 7 you can get to it by…
- Start > type in “UAC”
- Select “Change User Account Control settings
- By default the slider would be at “Default – Notify me only when programs try to make changes to my computer”
- To disable the Secure Desktop for elevation prompts move this slider down one so you see “Notify me only when programs try to make changes to my computer (do not dim my computer)”
Windows 7 Beta will be available for public download on January 9th on the Windows 7 website. Interestingly, it will only be available to the first 2.5 million people. Let’s see if I will be one of them 🙂 For more information checkout Brandon’s post on the Windows blog.