Haha, SBC! 🙂

As a programmer I know sometimes this is what you want to say, but what can I say, we have to live with backwards compatibility even if it means twice as much work.
The page that you are looking for could not be found. I recently switched to a new content management platform so some of the old links no longer work. Below are the search results based on the link that you clicked on.
Haha, SBC! 🙂
As a programmer I know sometimes this is what you want to say, but what can I say, we have to live with backwards compatibility even if it means twice as much work.
2009-11-03, update: GeoHot released the unlock for baseband 05.11.07! Check it out.
—-
Recently a friend purchased an iPhone off of craigslist that he wanted to unlock for use with a different carrier. The phone was running iPhone OS 3.1, which the dev team has released a jailbreak for. Unfortunately, what he didn’t know was that the boot loader (or bootloader) version mattered a lot 🙂
He wanted a good, clean unit, and this was a newly refurbished one, jailbroken, very clean, no scratches, and 0 minute usage. He thought all he had to do was install ultrasn0w and he would be good to go. Well, he tried, but no luck. After a few tries he brought it to me and I started my research. Apparently, because it is a newly refurbished unit, it had the latest version of everything: iPhone 3.1 (seller might have upgraded it), latest baseband, and latest boot loader. Here is what my research turned up.
If you are buying an iPhone for use with a carrier other than AT&T then make sure that your device can be unlocked. Also, be careful once you do get the new, compatible iPhone because upgrading to iPhone OS 3.1 using the official ipsw will upgrade the baseband! and possibly the boot loader; you will be stuck without an unlock! (Hopefully you are not reading this post after the fact :|)
The easiest way to check the boot loader and baseband versions is to install Fuzzyband using Cydia. Do this before the purchase. You want a boot loader that is 05.08 or older, and a baseband that is 05.11.07 or older (if it is 05.11.07 then you will have to downgrade to an older version, which is possible assuming that the boot loader version is correct).
Basically, you need an AT&T subscriber 🙂 Here are a few (realistic!) possibilities.
I recently upgraded my main Windows Vista desktop to Windows 7 RTM. I chose to upgrade instead of doing a clean install because I had a lot of programs installed that I did not want to reinstall (too time consuming). The whole upgrade process wasn’t too bad, I had to uninstall a few programs and reinstall them after the upgrade. In addition to the uninstall/install, I encountered a few odd problems after the upgrade.
One of these problems was that my DVD drive disappeared. It wasn’t just the DVD drive, Daemon Tools’ virtual drive also wasn’t showing up. Looking at the devices in device manager I saw the following error.
Windows cannot verify the digital signature for the drivers required for this device. A recent hardware or software change might have installed a file that is signed incorrectly or damaged, or that might be malicious software from an unknown source. (Code 52)
After searching online I found out that this had to do with some drivers that iTunes, Zune (!) and a few other programs had installed. Most of these programs are compatible with Windows 7, but the upgrade process didn’t deal with this case very well.
Anyways, if you search online you will find several solutions that require you to play around with the registry or have you install some random driver. Some even suggest disabling driver signing check. I didn’t prefer doing any of these.
After a little more search I ended up on this Microsoft Help and Support article. It described the exact problem that I was having and it had an automated fix. When I downloaded and ran the fix, it complained that it doesn’t work with my version of Windows. Knowing that the fix was compatible with Windows Vista, the workaround was simple:
Now you should be able run the fix. Restart after the fix has installed and your drives should be back. Have fun!
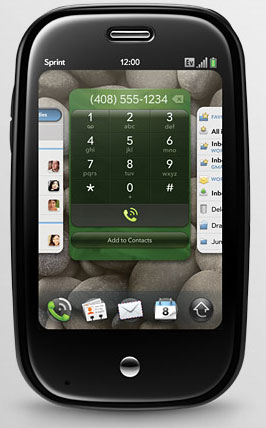
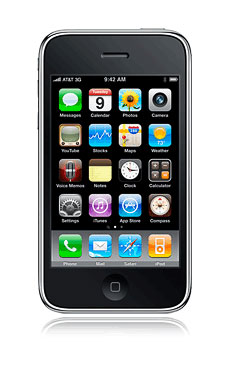
I have been using the HTC Tytn for almost two years and my contract with my current carrier, T-mobile, expired in December. At the time the main options that I was considering were the Apple iPhone, T-mobile G1 or the HTC Touch Diamond. The HTC Touch phones run Windows Mobile (WinMo) and I wasn’t particularly excited because I have been using a WinMo 6 phone for a while. It gets the job done, but isn’t pretty or “finger-friendly.” The G1’s operating system was new, but the hardware wasn’t particularly exciting. Just when I was starting to seriously explore the iPhone, Palm announced the Pre. Looking at the initial videos of the Pre I decided to wait for it. Well, finally the Pre has been out for a month and it is about time for me to decide.
Here is what I am looking for in my next phone…
Django’s forms (previously knows as newforms) framework has a lot cool functionality including the ability to output label tags. So, instead of typing the complete label and setting the correct for, you can just do form.field_name.label_tag and everything else is taken care of for you. The only problem is that there is no easy, documented way of adding an indicator (e.g. *) for required fields. One way would be to do if’s on each field and manually add an asterisk in the template, but that’s not DRY. After some search a few weeks ago I found an interesting post by Adil Saleem that showed one way of easily accomplishing this without changing all of your templates.
I really liked Adil’s solution, but I also wanted to change the class on the label so I could make those fields stand out (through CSS), and I also realized that he was really creating a python decorator, but in a weird way. So, here is a revised version of his solution with a slightly different approach (overriding label_tag instead of __init__) that adds the required field indicator and specifies a special CSS class (“required”) through a python decorator.
First we define two functions.
1 2 3 4 5 6 7 8 9 10 11 12 13 14 15 16 17 |
from django.utils.html import escape def add_required_label_tag(original_function): """Adds the 'required' CSS class and an asterisks to required field labels.""" def required_label_tag(self, contents=None, attrs=None): contents = contents or escape(self.label) if self.field.required: if not self.label.endswith(" *"): self.label += " *" contents += " *" attrs = {'class': 'required'} return original_function(self, contents, attrs) return required_label_tag def decorate_bound_field(): from django.forms.forms import BoundField BoundField.label_tag = add_required_label_tag(BoundField.label_tag) |
The first function is a decorator that provides the functionality and the second function assigns this decorator to BoundField.label_tag. The second function is really a helper function that allows you to easily add this to all your form modules.
Add the above code to one of your library files (maybe project.forms.__init__.py) and then in the module that defines your forms add the following code.
1 2 |
from project.forms import decorate_bound_field decorate_bound_field() |
Other than this you need to define the “required” CSS class.
1 |
label.required { font-weight: bold; } |
Refresh your page with the form and all of your required fields will have an asterisk and the labels will be bold. Credit goes to Adil Saleem for coming up with the initial version, this is just a refinement 🙂
Let’s see if I can get this across with a super blurred photo. Below is a picture of my facebook “home” page. Notice how the same “block” (picture + three comments) is repeated several times, in total it was repeated four times. Knowing how challenging some queries with joins and grouping can be, I don’t blame facebook 🙂

The default Ubuntu repository is very busy and sometimes slow, especially around releases. So, one of the first things that I generally do after installing Ubuntu is change the repository to one that is generally more responsive. Synaptics has a nice features which it tests which repository might be best in your case, use that to figure out which one to use. In my case the MIT repository mostly seems to be very snappy. Below are the steps to changing the repository. Fortunately, it is all point-and-click.
1. Open Synaptic Package Manager (Ubuntu menu > System > Administration > Synaptic Package Manager).
2. Go to Settings menu, then “Repositories”
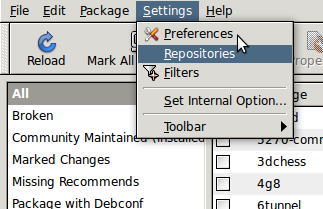
3. Under the first tab “Ubuntu Software” open the “Download from:” drop down and select other.
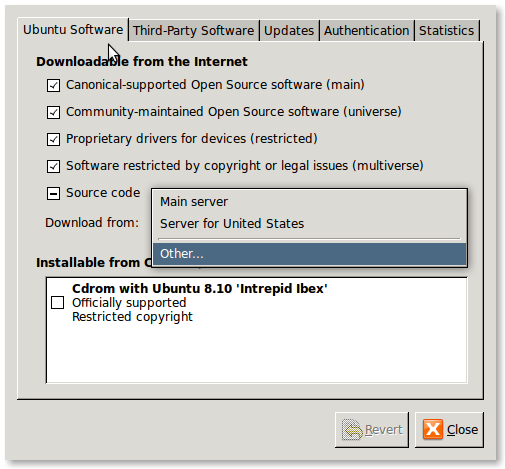
4. Here you have two options, first let Synaptic figure out the best server by clicking “Select Best Server” or pick one that I know generally works pretty good in US, the MIT repository (Under “United States” choose ubuntu.media.mit.edu).
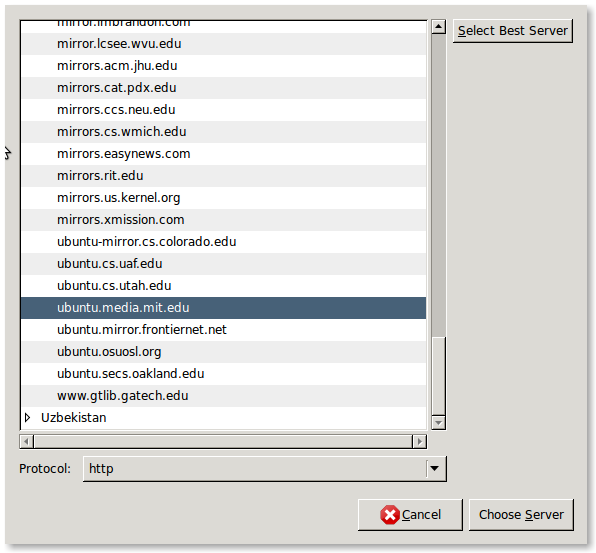
5. Click “Choose Server” and then close.
6. Now reload the repository and enjoy the faster download speeds 🙂

As part of my rebranding I have redesigned my personal website. As you might have noticed a little while back, I changed my twitter name from “@thebitguru” to @farhanahmad. This redesign is the next step as I become Farhan Ahmad from thebitguru 🙂 Why? you ask. Well, it is a little weird when you go to events and people recognize thebitguru, but don’t know who “Farhan Ahmad” is. I will still keep the domain name, but my name will be more prominent from now on.
For now I went for a simple design, no fancy graphics. My goal is to make minor changes as I get more time. Also, I am now publishing my twitter updates on the site.
Hopefully you like what you see 🙂 Enjoy!